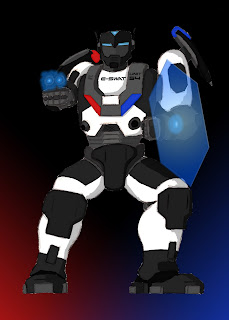
Yesterday, I've finally completed my robot character design in Photoshop with some textures, shading, and also created a suitable background to place the character in.
Evaluation of the 2D Concept Process
I first found it really quick to work onto 2D completely. From creating different character silhouettes for exploring different proportions towards creating rough designs with colour in Photoshop with a graphics tablet. I also then moved on to drawing the detailed character based on the chosen design from the roughs, and scan the drawing into Photoshop where I then worked on colour blocking directly onto the scanned drawing during the colour test developments.
When colour tests were completed, I then finalised the design with texture and shading onto the chosen colour scheme in Photoshop to make the character stand out.
So overall, working completely in 2D is very quick and efficient towards developing characters. However, I feel that it would be really handy to have a 3D rendered image of the detailed character to help with the texture and shading work in perspective instead of a scanned drawing. I'll keep this in mind towards the hybrid concept developments for the third character.
2D Pipeline evaluations
1. Silhouettes: Quick and more efficient to explore the character's proportions and characteristics. It can also be used as main structure towards rough concept stage with colours in Photoshop.
2. Rough Details: Also quick to work on for developing rough details in colour over the two chosen silhouettes. Reasons for choosing the two silhouette designs out of the eight versions was because of not only their unique characteristics, but because of the process that can again be quick and efficient to develop further concepts all in Photoshop.
3. Detailed drawing and Colour Tests: For this, I've decided to draw the detailed design on paper and scan the drawing into Photoshop for colour tests. It's more suitable for me to work on instead of drawing the character directly in Photoshop as I'm more experienced on drawing characters traditionally than digitally. The colour tests had also gone smoothly as I can paint over the drawing and create up to 5 different versions, and it's also time saving this way.
4. Final Detailed Design: The same approach as the colour tests. Draw another detailed character concept in an action pose, scan the image, and paint over the drawing including shading and textures until the artwork is complete in Photoshop.
No comments:
Post a Comment