Wednesday 27 April 2011

Character No. 4 Silhouettes (Updated)

An updated version of Character No. 4's Silhouettes with two extra designs along with modifying their proportions and sizes.

Updated Silhouette

First 1 minute showreel for Showcase Project

Last night, I've managed to put together my first 1 minute showreel for the Showcase project, and emailed the video file to Dave (who is in charge of the showreel group). It contains all the three character developments including artwork images and turnaround animations of the 3D characters (from ZBrush).

1 Minute Showreel


Project Tasks 12 (Revised again)

27/04/11 - Meeting with Lynn, and continue with Character No. 4 developments.

28/04/11 - Finishing rough detail concepts, and begin base mesh modelling in ZBrush or Maya for Character No. 4.

29/04/11 - Continue with dissertation draft for chapters 4 and 5.

02/05/11 - Meeting with Gordon, update Character No. 3 image, and continue with forth character's mesh modelling in ZBrush or Maya.

Meeting with Academic Supervisor 27/04/11

During the afternoon meeting with Lynn, we've discussed about my developments on my third character (including the updated pose and final image), the beginning of my forth and final character developments along with using the chosen methodology out of the previous three, and also the updates for my second dissertation draft. We also talked about plans on how I will finish the final character and have enough days to create a final showreel before the project's deadline (Friday the 13th of May 2011).

Lynn believes that I'm making very good progress for my project (including the practical work), and will also email me the dissertation and the learning contract drafts with her feedbacks on them.

So for next week, I need to work on the agreed action points as follows:
  • Continue with forth character developments.
  • Redraft Learning Contract.
  • Address dissertation draft.
  • Show Character No. 3 developments to Gordon.

Monday 25 April 2011

Character No. 4 Silhouettes

I've managed to get started on the fourth character developments with Silhouettes from Photoshop. Though most of the silhouette's proportions looks the same (still sticking with a muscle type human), but I did made an attempt to create different costumes (e.g. shoulder pads, power cords coming out of the hips or arms).
The step is to work on the rough detailed concepts based some chosen silhouettes in traditional form (drawing in a sketchbook with a pencil) instead of using Photoshop.

Character No. 4 Silhouettes

Project Tasks 12 (Revised for Character No. 4 developments)

25/04/11 - Finish final Character No. 3 image, and silhouette developments for Character No. 4.

26/04/11 - Draft for Chapter 4 in dissertation, and rough detailed sketches in sketchbook.

27/04/11 - Meeting with Lynn, and base mesh modelling in ZBrush (with ZSpheres).

28/04/11 - Draft for Chapter 5 in dissertation, and finish Low Poly mesh in ZBrush/Maya.

29/04/11 - Meeting with Gordon, High Poly sculpting on mesh, and colour tests with polypaint.

2D and 3D Concept Process List (Revised)

This is the revised version of the concept art process list for the 2D and 3D Methodology towards the developments for Character No. 4.

  • Silhouettes in Photoshop.
  • Rough detailed drawings of concepts in sketchbook (instead of using Photoshop).
  • Base Mesh Modelling in ZBrush (instead of Maya), and Low Poly modelling in Maya (topology work).
  • High Poly sculpting on Low Poly mesh in ZBrush.
  • Colour tests with polypaint in ZBrush and Phoroshoop (including texture developments).
  • Render Pass from ZBrush and composite final image in Photoshop.
  • UV mapping with UV Master in ZBrush.
  • Normal mapping process from High Poly mesh onto Low Poly mesh.
  • Final texture work on UV map in Pohotoshop.
  • Final model in action pose with turnaround animations.

Chosen Methodology towards Character No. 4 Developments

After developing and gathering the results from each concept art methodology processes, I've decided that the 2D and 3D method would be the best approach towards developing the forth and final character for this project. My reason for this choice was because not only I've found it very creative and efficient to develop concept art this way, but I discovered that based on my previous research on some existing artists, most of them would use the hybrid method towards developing their own concept art. I also thought that this type of concept methodology would benefit towards my own practice in character design as a 3D Artist/Character Modeller.

I now need to create a updated and final 2D and 3D concept process list, and see what areas I would like to add or take out (e.g. if I wanted to add the rough detailed sketching instead of rough concepts in Photoshop). And I also need to work though the UV/Normal mapping process for my forth character as part of the character developments for games along with presenting the final rendered image and a turnaround animation of the final character.

2D and 3D Concept Methodology Results

The results from the overall developments for Character No. 3 using the 2D and 3D concept methodology, it's found that this method is more convinient and more creative to use. One of the reasons for this was I found that using some 2D elements such as developing silhouettes and creating rough textures on the 3D image is a good way to develop the concept. I also thought that the use of 3D polypaint and the render pass in ZBrush is more efficient towards developing colour tests and also the render compositing in Photoshop (also add some textures) to create the final image and design of the concept.
So overall, I believe that this method is more effective to use, and even if the project mainly focuses on 3D, theres nothing wrong with using some 2D elements to develop a creative and outstanding concept art towards any medium (even for games).

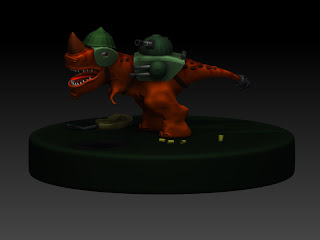
Dino Tank (Character No. 3) Final Image


This afternon, I've managed to made my first attempt to combine the
rendered images from ZBrush and for a final image of my third character concept in Photoshop.


Final Image of Character No. 3

Friday 22 April 2011

Project Tasks 12

25/04/11 - Continue with compositing final image of Character No. 3 in Photoshop, and decide which concept art methodology process for Character No. 4.

26/04/11 - Draft for Chapter 4 in dissertation, and begin Character No. 4 developments.

27/04/11 - Meeting with Lynn, and continue with Character No. 4 developments.

28/04/11 - Draft for Chapter 5 in dissertation, and continue with Character No. 4 developments.

Current Progress on Final Image for Character No. 3

I've sucessfully managed to create a range of render passes for the hybrid creature in ZBrush from different metal materials to skin textures.
However, I'm encountering some problems with compositing these materials into Photoshop. I then emailed Gordon to make arrangements for a meeting sometime this week and ask if he could assist me with the image compositing part in Photoshop.

Chosen Colours for Character No. 3

Wednesday 20 April 2011

The complete colour tests for Character No. 3

The colour tests for Character No. 3 has finally been completed as two versions were done from ZBrush's polypaint and another two from Photoshop.


Colour Test No. 1 (ZBrush Polypaint)


Colour Test No. 2 (ZBrush Polypaint)


Colour Test No. 3 (Photoshop)


Colour Test No. 4 (Photoshop)


From the overall results for this process, I found that it's better to use polypaint in ZBrush to for colour blocking onto the 3D model. However, I also found that I can use Photoshop to simply apply rough texttures and any typography on the rendered image to make the concept look more efficient and appealing. So I again would prefer to use polypaint to work on the colour tests, and also only use Photoshop for the texture developments during the colour test stage.

Project Tasks 11 (Revised)

Based on yesterday's feed backs from my meeting with Lynn, I've revised this week's tasks for continuing the dissertation draft and also the third character developments between ZBrush and Photoshop.

20/04/11 - Two colour tests in Photoshop (coloured over the rendered image fromZBrush).

21/04/11 - Draft for Chapter 4 in dissertation, and develop multi render passes of 3D model from ZBrush towards the composite developments in Photoshop.

22/04/11 - Draft for Chapter 5 in dissertation, composite final image of Character No. 3 in Photoshop, and evaluate the results about isung 2D and 3D methodology concept art process.

Tuesday 19 April 2011

Meeting with Academic Supervisor 19/04/11

This afternoon's meeting with Lynn went really well, and was also impressed with both my second and third character developments from the previous two weeks.
Lynn then suggested that I should update the third character's leg pose as by looking at the image, it would look as if the creature is about to fall. She also suggests that I can work on two colour tests approaches, like if I do two with polypaint in ZBrush, and two with the paint and texture tools over the rendered image in Photoshop since I'm working on the hybrid methodology process.
We've also discussed about how I can structure chapters 4 and 5, and also include some case studies on existing game characters (each about their concept art approaches) for the dissertation.

So for next week, I need to work on the following action points as agreed from today's meeting:
  • Continue with colour tests for Character No. 3 (with ZBrush polypaint and Photoshop).
  • Update Character No. 3's standing pose in ZBrush.
  • Work on drafts for Chapters 4, 5, and 6 in dissertation.
  • Write results and proposal for final method towards developments for Character No. 4.

Monday 18 April 2011

Character No. 3 High Sculpt and First Colour Test

This afternoon, I've finally finished the sculpting work on the creature's base mesh (from Maya), and I even then created the creature's action pose with the Transpose tool in ZBrush.

High poly hybrid creature in Action Pose


Turnaround Animation


As soon as the transpose was done, I began to worm on developing the first colour test for the hybrid creature using polypaint. I'll be continuing with the other three colour tests tomorrow evening, and then hopefully move on to the multi rendering pass stage for the final image developments.

Colour Test No. 1

Updates for Character No. 2

While continuing with the development work for Character No. 3, I've made some quick updates with the second character's shoulders and changed the colour scheme since the feed backs from the previous colour tests indicates that the second version was more popular. When this was done, I then made some turnaround animations of the finished monster character.

Turnaround Animation No. 1


Turnaround Animation No. 2


Turnaround Animation No. 3

Friday 15 April 2011

Project Tasks 11

18/04/11 - Continue with high poly scupting in ZBrush, and then begin developing colour tests with polypaint (also in ZBrush).

19/04/11 - Meeting with Lynn, meeting with Clair Brennan, continue with colour tests, and then develop multi render passes for the photoshop stage (with ZBrush's render tool).

20/04/11 - Composite the final image of Character No. 3 in Photoshop including textures, shadings, and lighting, and evaluate the results.

21/04/11 - Continue with dissertation draft (for Chapter 4), update Character No. 2's final model (in action pose and turnaround animations), and also create turnaround animations for Character No. 3.

22/04/11 - Decide the methodologies for Character No. 4's development process, begin developments for Character No. 4, and dissertation draft on Chapter 5.

Progress on Character No. 3's base mesh and high poly work

I've been working on the base mesh modelling process in Maya, and it's taken me two days longer to work on than expected. But this evening, I've eventually finished the base mesh modelling, and gone straight into high poly modelling for the organic part of the hybrid creature. So hopefully by next week, I should have the third character finished and then decide which concept art methodology I should proceed towards developing the fourth character on this project.

Monday 11 April 2011

Character No. 3 Rough Concepts

Based on the tree chosen silhouettes from the previous developments, I've applied to each concept with some rough details on both the creature's organic body and the tank armor.
I now need to decide which one of the three rough concepts would be selected for the further development stage in 3D, and perhaps do some rough 3D designs for the tank armor from Maya before going into ZBrush.
During the rough detailed developments, I've found it quick and fun to freely create some rough designs for each chosen silhouette, especially when working on the hybrid creature before going into the 3D mesh modelling stage.

The three rough concepts for Character No. 3

Friday 8 April 2011

Character No. 3 Silhouettes

Theses silhouettes for Character No. 3 were created in Photoshop (the same method from the first development process for the 2D character) in a total of nine concepts (different proportions for each one). I've also created the grey silhouettes for the tank armor (the cannons and the helmet) and apply each different versions to each silhouette designs to make them stand out (also useful to use towards the 3D stage when modelling the seperate organic and machine parts).
This process again is quick and efficient to work on, especially when exploring the creature's form and proportions before going into rough detail developments for the chosen two.

Character No. 3 Silhouettes

Project Tasks 10


  • 08/04/11 (refined) - Update Character No. 3 in ZBrush, Learning Contract Draft, and also being Character No. 3 developments (silhouettes).

  • 11/04/11 - Redraft section 2.2, 2.3 and 2.4 for Chapter 2 in dissertation, and work on rough detail concepts for Character No. 3.

  • 12/04/11 - Redraft section 3.1 and 3.2 for Chapter 3 in dissertation, and rough 3D mesh developments for Character No. 3 in ZBrush/Maya.

  • 13/04/11 - Continue with low poly mesh process for Character No. 3.

  • 14/04/11 - Draft on Chapter 4 for dissertation, and Character No. 3's high poly developments in ZBrush.

  • 15/04/11 - Colour Tests with polypaint (from ZBrush) for Character No. 3, and create multi render pass (different render materials and effects).

Meeting with Technical Supervisor (08/04/11)

I've shown Gordon my two character developments (both the 2D character and the 3D character), and so far he was imprerssed of my current work. When he saw my 3D character work in the turnaround animation from ZBrush, he noticed that the shoulders looks short. He then suggests that I update the character's shoulders by lowering the mesh and use the move brush tool to increase the shoulder's scale size to even the arms. He also suggests that I should apply a turntable mesh for the character and the axe to stand on and add some rocks to the stand to create a well presented character in a turnaround animation. Finally, he mentions that I can use the render pass method for the final process of the 2D and 3D character development work, simply by creating different render images fromZBrush, and the composite the final image into Photoshop (this was also the same method used by Josh Nizzi from his character tutorial on DVD). He also suggests that I shoyuld take a look at the tutorials on this while I work on my 2D and 3D character developments throughout, and then try this during the character's polish rendering process.

Thursday 7 April 2011

Further Developments on Showcase Invitations

While I've just finished off my second character developments in 3D, I went back to work further on the Showcase Invitations along with colour schemes. As soon as I've recieved the final logo and robot design from the other graphic members, I then layed out the images and some text onto the deigns. I then emailed the Photoshop files to Andrew (the graphics eam leader) and show the designs to Kevin for final approval and decisions on one of them.


Colour Concept No. 1


Colour Concept No. 2


Colour Concept No. 3


Colour Concept No. 4


Final Front Side Design


Final Back Side Design Version 1


Final Back Side Design Version 2

Character No. 2 Completed with turnaround Animations


After working on the colour tests for Character No. 2, I've decided to choose the fourth colour version of the character as the final design. I've also managed to model and polypaint the character's axe weapon (modelled from Maya) and placed the prop next to the character in one scene in ZBrush.
I was having some trouble with the transpose tool in the attempt to create the character's pose, so I've decided to leave it aside for the moment and focus on positioning the character and the axe for the turnaround animation in ZBrush.

Rendered Image


Coloured Image


Turnaround Animation


As for the overal process in developing a character only in 3D, it first took longer to develop than the 2D development process especially the sculpting process. However, the 3D silhouettes were just as quick as the 2D method towards creating rough meshes for further developments. I've also found that ZBrsuh is the best way of developing characters completely in 3D, especially using tools such as ZSpheres for 3D silhouettes and polypaint to colour the character's mesh directly with a graphics tablet (very useful to use for sculpting and colouring process). And finally what's more useful, is that I can use the GoZ command to automatically export my mesh from ZBrush into Maya if I want to work on the topology or other areas for my model and then export it back into ZBrush for further sculpting.
So to recap, concepting a character completely in 3D can offer the advantage of creating silhouettes and developing colour tests, but the process of rough modelling and sculpting takes more time to develop.

Monday 4 April 2011

High Sculpted Character model and Colour Tests


This evening, I've managed to complete the high sculpt developments for Character No. 2 from ZBrush. Once this was done, I then began creating four colour tests on the character mesh with the Polypaint tool also in ZBrush. I need to choose one of the colour tests, and then finalise the design with turnaround animations by the end of this week and begin to work on the next character in the 2D and 3D methodology process.

Rendered Image of High Detailed Mesh


Gurok Colour Test 1


Gurok Colour Test 2


Gurok Colour Test 3


Gurok Colour Test 4

Friday 1 April 2011

Chosen 3D mesh with 2 Costumes concepts for Character No. 2

Last night, I've decided to work further on the second mesh concept for my monster character as the character's appearance/characteristics suits well for his profile, especially for his muscle features on the mesh. I've also creates two costume concepts and a weapon for the character mesh from Maya, exported these meshes into ZBrush as a group, and then arranged the grouped meshes into separate layers with the Subtool in ZBrush.

Mesh Costume Concept No. 1


Mesh Costume Concept No. 2